网站搭建 | SSL证书
为什么要SSL证书
传统的HTTP明文协议是不安全的传输协议,无法进行服务器端真实身份校验,也不能为传输数据提供加密保护,通过HTTP协议传输的数据时刻处在被窃听、篡改、冒充的风险中。
如果你访问一个网站默认了超文本传输协议(HTTP),其内容将明文传输。这意味着每个人在你和服务器之间的位置都可以看到你与网站的每个交互内容。当用HTTP传输私人信息(姓名,电子邮件,家庭住址,信用卡详细信息等),黑客可以轻易的从网络流量中截取你发送信息,因为这些都是明文传输。
为了解决HTTP协议的这一缺陷,需要使用另一种协议:安全套接字层超文本传输协议HTTPS,为了数据传输的安全,HTTPS在HTTP的基础上加入了SSL/TLS协议,SSL/TLS依靠证书来验证服务器的身份,并为浏览器和服务器之间的通信加密。

需求
免费(节省成本)
支持泛域名(会用到多个域名,使用泛域名省事)
选择
之前使用1panel服务器管理面板时对Let's Encrypt有所耳闻同时也能进行自动续签操作便选择向Let's Encrypt申请SSL证书。除此之外,还有一些其他组织提供有免费证书,比如Google Trust Services、SSL For Free、ZeroSSL、buypass等。
向 Let’s Encrypt 申请证书时,他们的服务器会验证申请人对证书中域名的控制权。
HTTP-01 验证 (最常见的验证方式)
Let’s Encrypt 向申请人的 ACME 客户端提供一个令牌,然后 ACME 客户端在 Web 服务器的
http://<你的域名>/.well-known/acme-challenge/<TOKEN>(用提供的令牌替换<TOKEN>)路径上放置指定文件, 该文件包含令牌以及帐户密钥的指纹。如果Let’s Encrypt在 Web 服务器上找到了放置于正确地点的正确文件,则该验证被视为成功,可以继续申请颁发证书。Let’s Encrypt只接受目标为“http:”或“https:”且端口为 80 或 443 的重定向。HTTP-01 验证只能使用 80 端口。 因为允许客户端指定任意端口会降低安全性,所以 ACME 标准已禁止此行为。
缺点:
- Let’s Encrypt 不允许使用此验证方式来颁发通配符证书(泛域名证书)
DNS-01 验证
此验证方式要求申请的域名下的 DNS解析TXT 记录中放置特定值来证明您控制域名的 DNS 系统。在 Let’s Encrypt 为ACME 客户端提供令牌后,客户端将创建从该令牌和配置的DNS帐户密钥派生的 TXT 记录,并将该记录放在
_acme-challenge.<YOUR_DOMAIN>下。 然后 Let’s Encrypt 将向 DNS 系统查询该记录。 如果找到匹配项,就可以继续颁发证书。优点:
- 可以使用此验证方式来颁发包含通配符域名的证书(泛域名证书)
TLS-SNI-01验证
ACME 的草案版本中定义了这一验证方式。 其原理是与 443 端口执行 TLS 握手时使用特殊的 SNI 字段,并验证证书是否包含特定信息。 这种方式不够安全,因此已于 2019 年 3 月被废除。
TLS-ALPN-01
这一验证类型是在 TLS-SNI-01 被弃用后开发的,并且已经开发为单独的标准。这一验证类型并不适合大多数人。 它最适合那些想要执行类似于 HTTP-01 的基于主机的验证,但希望它完全在 TLS 层进行以分离关注点的 TLS 反向代理的作者。 现在其主要使用者为大型托管服务提供商。
我需要申请的是泛域名证书,因此选择了DNS-01 验证方式进行申请。
HTTP验证需要把域名解析到具有公网IP的主机上,在解析到的服务器上进行申请。DNS验证只需要修改DNS解析记录就行,无需公网IP。
注意:
所有签发请求均受每周 5 个重复证书的限制。 超出重复证书限制时,会从 ACME 客户端收到如下错误消息:
too many certificates (5) already issued for this exact set of domains in the
last 168 hours: example.com login.example.com: see https://letsencrypt.org/docs/duplicate-certificate-limit
为什么证书的有效期限只有九十天?
2015年9月9日 • Josh Aas,互联网安全研究小组(ISRG)执行董事
我们有时会被问及为何只提供有效期限为九十天的证书。提出这个问题的人通常担心九十天太短,希望我们能像其他一些CA那样提供有效期一年或更长的证书。
在Web上,九十天并不是什么新鲜事。根据Firefox Telemetry的数据,29%的TLS交易使用的是九十天有效期的证书。这比其他任何有效期都要多。从我们的角度来看,这种较短的证书有效期有两个主要优势:
它们限制了密钥泄露和错误签发造成的损害。被盗的密钥和错误签发的证书在较短的时间内有效。它们鼓励自动化,这对于易用性来说绝对是至关重要的。如果我们要将整个Web迁移到HTTPS,我们不能继续期望系统管理员手动处理续签。一旦发行和续签自动化,较短的有效期不会比较长的那些更不方便。基于这些原因,我们不提供长于九十天有效期的证书。我们意识到我们的服务还处于初期阶段,而且许多订阅者对自动化还很陌生,因此我们选择了一个允许有足够时间进行手动续订的有效期。我们建议订阅者每六十天续订一次。一旦自动化续订工具广泛部署并且运行良好,我们可能会考虑更短的有效期。
申请证书
准备DNS权限账号
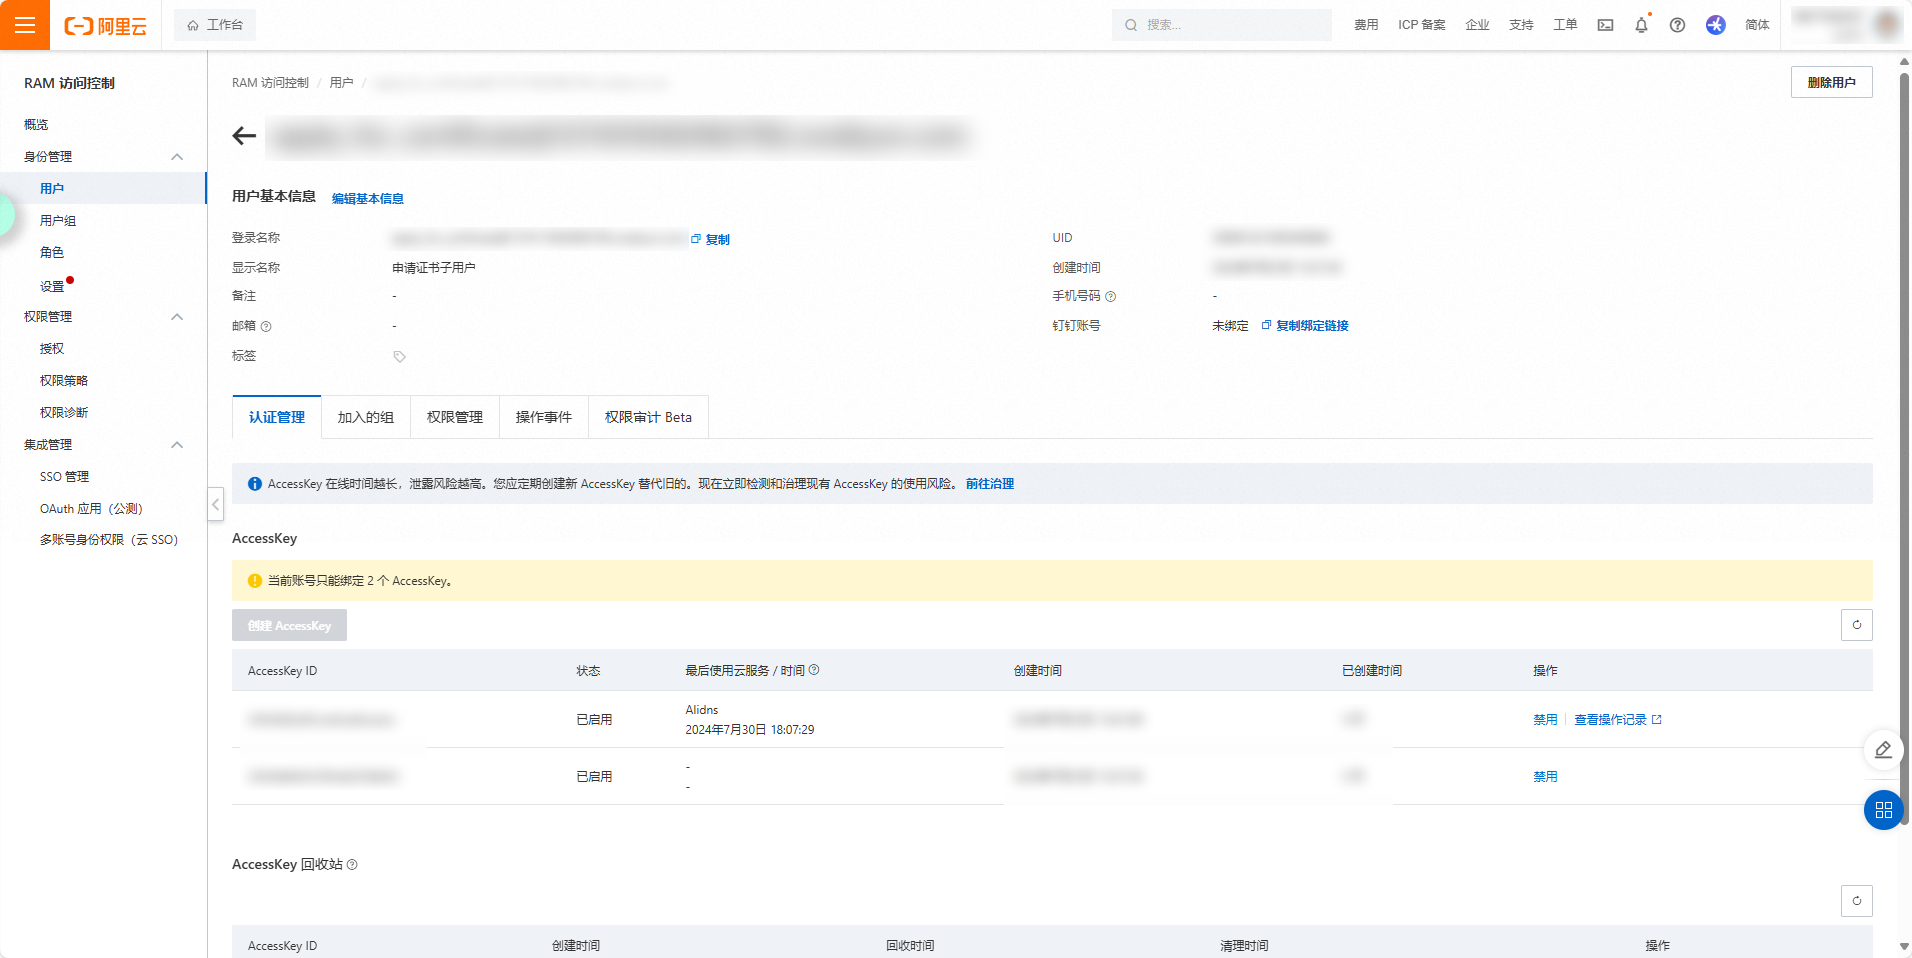
前往 https://ram.console.aliyun.com 申请阿里云子账号并授予 AliyunDNSFullAccess 权限,创建完成后记录AccessKey和AccessKey Secret下来以便后续使用(如果丢失密钥只能重新获取或者重新申请子账号)。
1panel
一开始是使用1panel面板配置Acme 账户和DNS 账户申请证书。

申请的证书在icurvestar.cn使用正常,但在blog.icurvestar.cn使用时却出现证书报红。因此,开始寻找其他工具来申请Letsencrypt证书的教程。
Nginx Proxy Manager
目前的SSL证书是根据找到的一篇《堪称免费申请永久泛域名SSL证书的完美解决方案》博客文章来申请,博文使用了Nginx Proxy Manager项目进行申请和续签
Nginx Proxy Manager - Docker 容器,用于通过简单、强大的界面管理 Nginx 代理主机
该项目以预先构建的 docker 镜像的形式提供,使您能够轻松转发到在家中或其他地方运行的网站,包括免费 SSL,而无需了解太多有关 Nginx 或 Letsencrypt 的知识。
创建挂载目录
mkdir data letsencryptdocker-compose.yml
services:
  app:
    image: jc21/nginx-proxy-manager:latest
    container_name: nginx-proxy-manager
    ports:
      # 81端口为后台管理页面
      - '81:81'
      # 目前我并不需要使用项目管理nginx,所以关闭80和443端口的映射
      # - '80:80'
      # - '443:443'
    volumes:
      - ./data:/data
      - ./letsencrypt:/etc/letsencrypt
    restart: unless-stopped
启动服务
docker compose up -d登录
默认管理员用户:
邮箱: admin@example.com
密码: changeme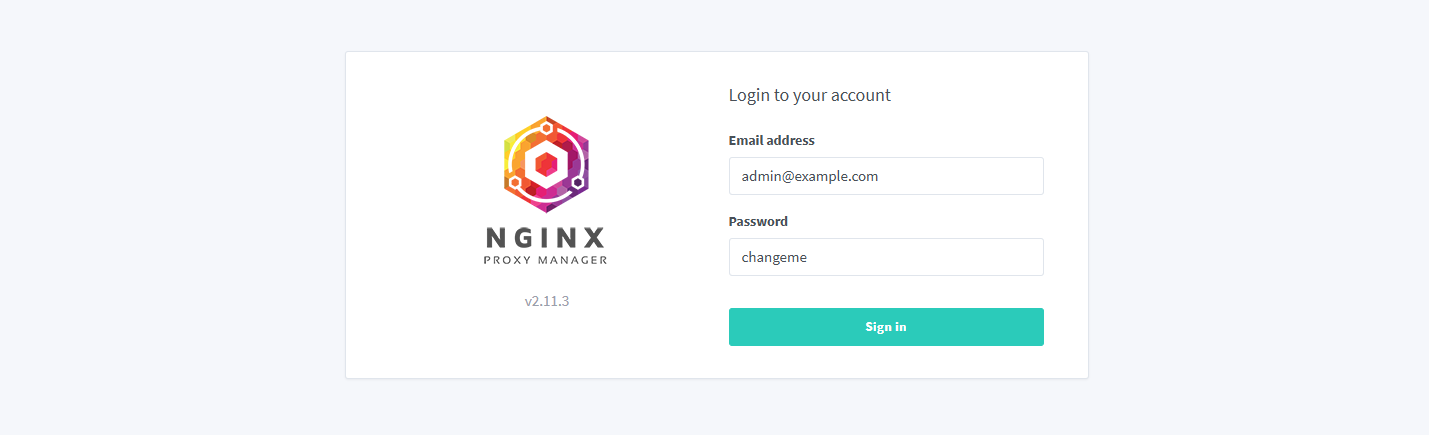
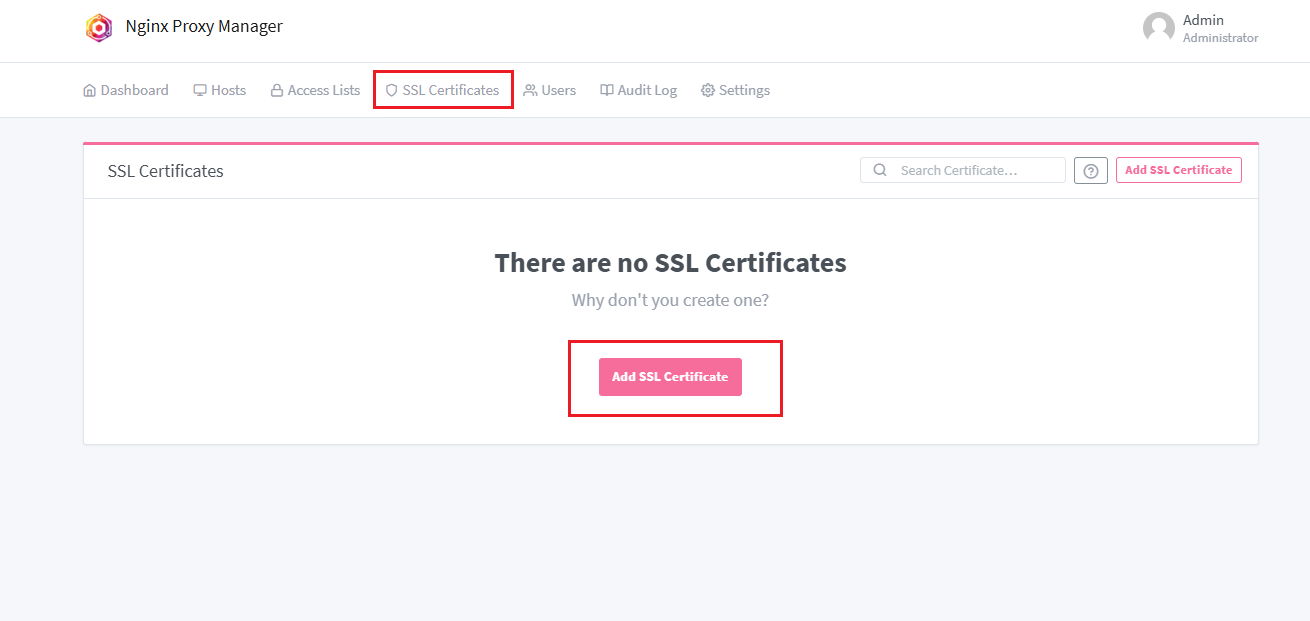
创建证书
选择【SSL Certificates】再点击【Add SSL Certificate】按钮
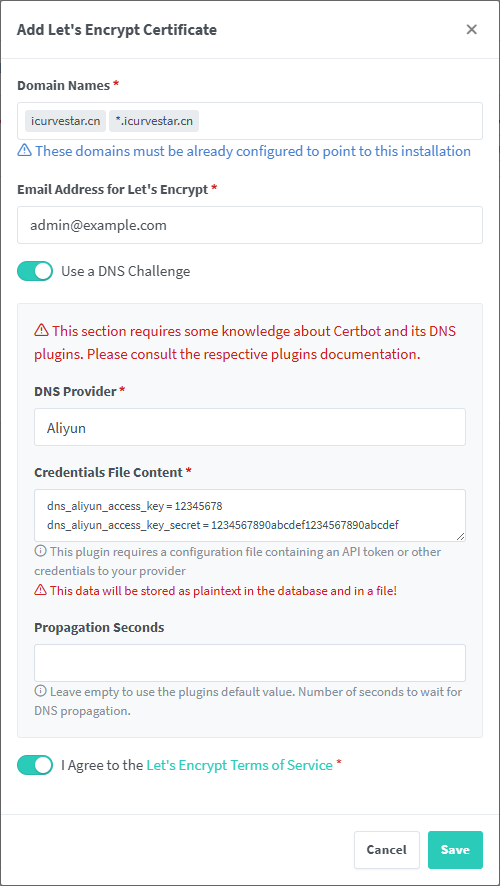
输入相关信息
| 项目 | 说明 | 示例 |
|---|---|---|
| Domain Names | 申请证书的域名 | icurvestar.cn *.icurvestar.cn |
| Email Address for Let's Encrypt | 随便填自己的邮箱 | admin@example.com |
| DNS Provider | DNS提供商(域名解析服务) | Aliyun |
| Credentials File Content | 凭据文件内容 | dns_aliyun_access_key = 12345678 dns_aliyun_access_key_secret = 1234567890abcdef1234567890abcdef |
填写完信息后点击【Save】按钮保存,若遇到失败情况确认信息无误后多重复几次
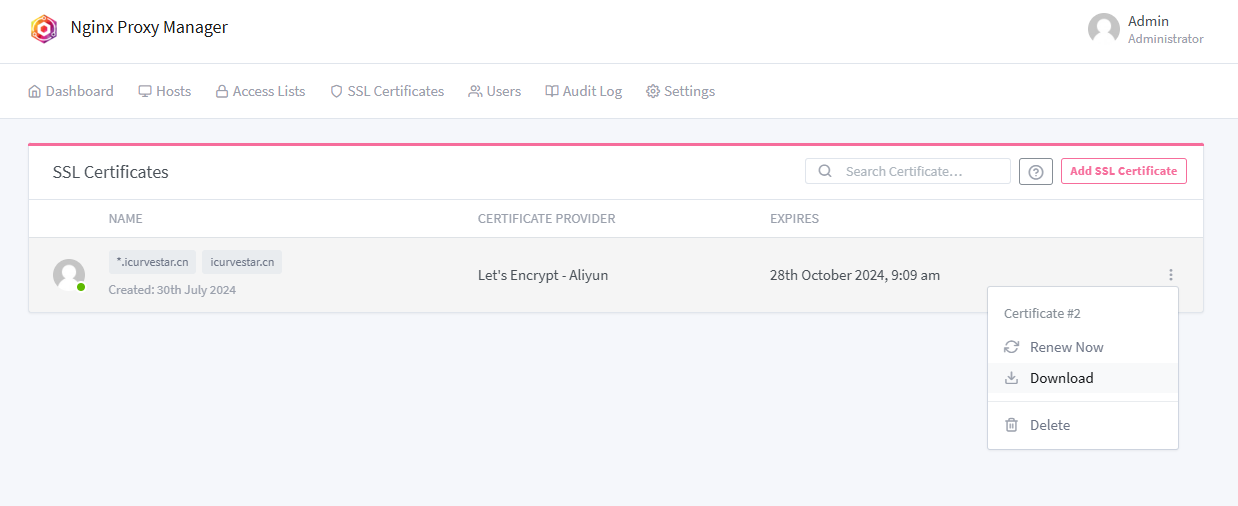
完成后可点击右侧更多菜单的【Download】下载按钮下载证书到本地或者点击【Renew Now】现在续签按钮进行续签
下载证书
下载后的证书文件有4个
# unzip -l certificate.zip
Archive:  certificate.zip
  Length      Date    Time    Name
---------  ---------- -----   ----
     1330  07-30-2024 10:09   cert1.pem
     1566  07-30-2024 10:09   chain1.pem
     2896  07-30-2024 10:09   fullchain1.pem
      306  07-30-2024 10:09   privkey1.pem
---------                     -------
     6098                     4 files
This directory contains your keys and certificates.
privkey.pem:您的证书的私钥。fullchain.pem:大多数服务器软件使用的证书文件。chain.pem:在 Nginx >=1.3.7 中用于 OCSP 叠加。cert.pem:会破坏许多服务器配置,并且不应该使用 除非阅读了更多文档(见下文链接)。WARNING: DO NOT MOVE OR RENAME THESE FILES! Certbot expects these files to remain in this location in order to function properly!
We recommend not moving these files. For more information, see the Certbot User Guide at https://certbot.eff.org/docs/using.html#where-are-my-certificates.
查看证书内容
携带公钥的证书
fullchain1.pem 是完整证书链文件,它通常包含了服务器证书和证书链,合并了cert1.pem和chain1.pem的内容。
# 直接看cert1.pem和chain1.pem
openssl x509 -noout -text -in cert1.pem
openssl x509 -noout -text -in chain1.pem


# 将fullchain1.pem分割成单独的证书文件
awk 'BEGIN {c=0;} /-----BEGIN CERTIFICATE-----/ {c++;} {print > ("cert" c ".pem");}' < fullchain1.pem

# 查看第一个证书
openssl x509 -noout -text -in cert1.pem

# 查看第二个证书
openssl x509 -noout -text -in cert2.pem

# 如果有更多证书,继续查看
# openssl x509 -noout -text -in cert3.pem
# ...
私钥
openssl ec -noout -text -in privkey1.pem
或
openssl rsa -noout -text -in privkey1.pem
续签证书
在Nginx Proxy Manager申请证书后会自动续签,每隔一个小时系统将检查一次证书的过期状态,若是距离过期小于30天会执行续签操作。
目前不打算使用可视化的Nginx Proxy Manager作为反向代理web服务器,所以是证书在Nginx Proxy Manager自动续签,手动替换使用的Nginx容器的证书再执行重新加载Nginx配置文件命令
nginx -s reload网站目前没有频繁业务需求,可以忽略可能造成连接不稳定,丢失业务的影响。
源码解析
Nginx Proxy Manager是使用Certbot客户端来申请和续签的。
Certbot DNS 插件配置
在NginxProxyManager项目的global/certbot-dns-plugins.json配置了许多家DNS厂商的插件配置,其中阿里云DNS如下
"aliyun": {
	"name": "Aliyun",
	"package_name": "certbot-dns-aliyun",
	"version": "~=0.38.1",
	"dependencies": "",
	"credentials": "dns_aliyun_access_key = 12345678\ndns_aliyun_access_key_secret = 1234567890abcdef1234567890abcdef",
	"full_plugin_name": "dns-aliyun"
}
此文件包含有关可用 Certbot DNS 插件的信息。这仅适用于使用标准参数结构的插件,因此:--authenticator ---credentials ---propagation-seconds
后端有3个文件引用了certbot-dns-plugins.json,分别是backend/scripts/install-certbot-plugins、backend/lib/certbot.js和backend/internal/certificate.js。
封装批量安装插件脚本
backend/scripts/install-certbot-plugins
批量安装在 certbot-dns-plugins.json 中定义的所有插件:
#!/usr/bin/node

// Usage:
//   Install all plugins defined in `certbot-dns-plugins.json`:
//    ./install-certbot-plugins
//   Install one or more specific plugins:
//    ./install-certbot-plugins route53 cloudflare
//
// Usage with a running docker container:
//    docker exec npm_core /command/s6-setuidgid 1000:1000 bash -c "/app/scripts/install-certbot-plugins"
//

const dnsPlugins = require('../global/certbot-dns-plugins.json');
const certbot    = require('../lib/certbot');
const logger     = require('../logger').certbot;
const batchflow  = require('batchflow');

let hasErrors      = false;
let failingPlugins = [];

let pluginKeys = Object.keys(dnsPlugins);
if (process.argv.length > 2) {
	pluginKeys = process.argv.slice(2);
}

batchflow(pluginKeys).sequential()
	.each((i, pluginKey, next) => {
		certbot.installPlugin(pluginKey)
			.then(() => {
				next();
			})
			.catch((err) => {
				hasErrors = true;
				failingPlugins.push(pluginKey);
				next(err);
			});
	})
	.error((err) => {
		logger.error(err.message);
	})
	.end(() => {
		if (hasErrors) {
			logger.error('Some plugins failed to install. Please check the logs above. Failing plugins: ' + '\n - ' + failingPlugins.join('\n - '));
			process.exit(1);
		} else {
			logger.complete('Plugins installed successfully');
			process.exit(0);
		}
});批量安装插件脚本调用了backend/lib/certbot.js来逐一安装。
单个安装插件脚本
const dnsPlugins = require('../global/certbot-dns-plugins.json');
const utils      = require('./utils');
const error      = require('./error');
const logger     = require('../logger').certbot;
const batchflow  = require('batchflow');

const CERTBOT_VERSION_REPLACEMENT = '$(certbot --version | grep -Eo \'[0-9](\\.[0-9]+)+\')';

const certbot = {

	/**
	 * @param {array} pluginKeys
	 */
	installPlugins: async function (pluginKeys) {
		let hasErrors = false;

		return new Promise((resolve, reject) => {
			if (pluginKeys.length === 0) {
				resolve();
				return;
			}

			batchflow(pluginKeys).sequential()
				.each((i, pluginKey, next) => {
					certbot.installPlugin(pluginKey)
						.then(() => {
							next();
						})
						.catch((err) => {
							hasErrors = true;
							next(err);
						});
				})
				.error((err) => {
					logger.error(err.message);
				})
				.end(() => {
					if (hasErrors) {
						reject(new error.CommandError('Some plugins failed to install. Please check the logs above', 1));
					} else {
						resolve();
					}
				});
		});
	},

	/**
	 * Installs a cerbot plugin given the key for the object from
	 * ../global/certbot-dns-plugins.json
	 *
	 * @param   {string}  pluginKey
	 * @returns {Object}
	 */
	installPlugin: async function (pluginKey) {
		if (typeof dnsPlugins[pluginKey] === 'undefined') {
			// throw Error(`Certbot plugin ${pluginKey} not found`);
			throw new error.ItemNotFoundError(pluginKey);
		}

		const plugin = dnsPlugins[pluginKey];
		logger.start(`Installing ${pluginKey}...`);

		plugin.version      = plugin.version.replace(/{{certbot-version}}/g, CERTBOT_VERSION_REPLACEMENT);
		plugin.dependencies = plugin.dependencies.replace(/{{certbot-version}}/g, CERTBOT_VERSION_REPLACEMENT);

		const cmd = '. /opt/certbot/bin/activate && pip install --no-cache-dir ' + plugin.dependencies + ' ' + plugin.package_name + plugin.version + ' ' + ' && deactivate';
		return utils.exec(cmd)
			.then((result) => {
				logger.complete(`Installed ${pluginKey}`);
				return result;
			})
			.catch((err) => {
				throw err;
			});
	},
};

module.exports = certbot;
其中有使用pip安装Python包命令
const cmd = '. /opt/certbot/bin/activate && pip install --no-cache-dir ' + plugin.dependencies + ' ' + plugin.package_name + plugin.version + ' ' + ' && deactivate';按照global/certbot-dns-plugins.json的阿里云插件配置则会下载
. /opt/certbot/bin/activate && pip install --no-cache-dir certbot-dns-aliyun~=0.38.1 && deactivate在certbot-dns-aliyun包的主页查看Project links Homepage得到了项目地址
certbot-dns-aliyun - 一个使用阿里云获取证书的certbot dns插件
证书类
backend/internal/certificate.js定义了许多关于证书的操作,其中包括了申请和续签
const internalCertificate = {
  // 定义允许的SSL文件类型数组
  allowedSslFiles: [],

  // 定义定时器的时间间隔,单位为毫秒
  intervalTimeout: 0,
  // 定时器的引用
  interval: null,
  // 定时器是否正在处理的标志
  intervalProcessing: false,
  // 定义在证书到期前多久开始续订的天数和时间单位
  renewBeforeExpirationBy: [],

  // 初始化SSL证书续订定时器
  initTimer: function() {},
  // 定时触发,处理即将到期的SSL证书
  processExpiringHosts: function() {},
  // 创建新的SSL证书
  create: function(access, data) {},
  // 更新现有的SSL证书
  update: function(access, data) {},
  // 根据ID获取SSL证书详情
  get: function(access, data) {},
  // 下载Let's Encrypt证书文件
  download: function(access, data) {},
  // 将文件压缩成ZIP格式
  zipFiles: function(source, out) {},
  // 删除SSL证书
  delete: function(access, data) {},
  // 获取所有SSL证书的列表
  getAll: function(access, expand, search_query) {},
  // 获取用户拥有的SSL证书数量
  getCount: function(user_id, visibility) {},
  // 写入自定义SSL证书
  writeCustomCert: function(certificate) {},
  // 快速创建Let's Encrypt证书
  createQuickCertificate: function(access, data) {},
  // 验证提供的证书文件是否有效
  validate: function(data) {},
  // 上传自定义证书文件
  upload: function(access, data) {},
  // 检查私钥是否有效
  checkPrivateKey: function(private_key) {},
  // 获取证书信息
  getCertificateInfo: function(certificate, throw_expired) {},
  // 从文件中获取证书信息
  getCertificateInfoFromFile: function(certificate_file, throw_expired) {},
  // 清理meta对象中的SSL密钥
  cleanMeta: function(meta, remove) {},
  // 通过HTTP挑战请求Let's Encrypt SSL证书
  requestLetsEncryptSsl: function(certificate) {},
  // 通过DNS挑战请求Let's Encrypt SSL证书
  requestLetsEncryptSslWithDnsChallenge: function(certificate) {},
  // 续订SSL证书
  renew: function(access, data) {},
  // 续订Let's Encrypt SSL证书
  renewLetsEncryptSsl: function(certificate) {},
  // 通过DNS挑战续订Let's Encrypt SSL证书
  renewLetsEncryptSslWithDnsChallenge: function(certificate) {},
  // 撤销Let's Encrypt SSL证书
  revokeLetsEncryptSsl: function(certificate, throw_errors) {},
  // 检查是否存在Let's Encrypt SSL证书
  hasLetsEncryptSslCerts: function(certificate) {},
  // 禁用正在使用的主机
  disableInUseHosts: function(in_use_result) {},
  // 启用之前禁用的主机
  enableInUseHosts: function(in_use_result) {},
  // 测试HTTPS挑战
  testHttpsChallenge: function(access, domains) {},
};
创建证书部分
	/**
	 * @param   {Access}  access
	 * @param   {Object}  data
	 * @returns {Promise}
	 */
	create: (access, data) => {
		return access.can('certificates:create', data)
			.then(() => {
				data.owner_user_id = access.token.getUserId(1);

				if (data.provider === 'letsencrypt') {
					data.nice_name = data.domain_names.join(', ');
				}

				return certificateModel
					.query()
					.insertAndFetch(data)
					.then(utils.omitRow(omissions()));
			})
			.then((certificate) => {
				if (certificate.provider === 'letsencrypt') {
					// Request a new Cert from LE. Let the fun begin.

					// 1. Find out any hosts that are using any of the hostnames in this cert
					// 2. Disable them in nginx temporarily
					// 3. Generate the LE config
					// 4. Request cert
					// 5. Remove LE config
					// 6. Re-instate previously disabled hosts

					// 1. Find out any hosts that are using any of the hostnames in this cert
					return internalHost.getHostsWithDomains(certificate.domain_names)
						.then((in_use_result) => {
							// 2. Disable them in nginx temporarily
							return internalCertificate.disableInUseHosts(in_use_result)
								.then(() => {
									return in_use_result;
								});
						})
						.then((in_use_result) => {
							// With DNS challenge no config is needed, so skip 3 and 5.
							if (certificate.meta.dns_challenge) {
								return internalNginx.reload().then(() => {
									// 4. Request cert
									return internalCertificate.requestLetsEncryptSslWithDnsChallenge(certificate);
								})
									.then(internalNginx.reload)
									.then(() => {
										// 6. Re-instate previously disabled hosts
										return internalCertificate.enableInUseHosts(in_use_result);
									})
									.then(() => {
										return certificate;
									})
									.catch((err) => {
										// In the event of failure, revert things and throw err back
										return internalCertificate.enableInUseHosts(in_use_result)
											.then(internalNginx.reload)
											.then(() => {
												throw err;
											});
									});
							} else {
								// 3. Generate the LE config
								return internalNginx.generateLetsEncryptRequestConfig(certificate)
									.then(internalNginx.reload)
									.then(async() => await new Promise((r) => setTimeout(r, 5000)))
									.then(() => {
										// 4. Request cert
										return internalCertificate.requestLetsEncryptSsl(certificate);
									})
									.then(() => {
										// 5. Remove LE config
										return internalNginx.deleteLetsEncryptRequestConfig(certificate);
									})
									.then(internalNginx.reload)
									.then(() => {
										// 6. Re-instate previously disabled hosts
										return internalCertificate.enableInUseHosts(in_use_result);
									})
									.then(() => {
										return certificate;
									})
									.catch((err) => {
										// In the event of failure, revert things and throw err back
										return internalNginx.deleteLetsEncryptRequestConfig(certificate)
											.then(() => {
												return internalCertificate.enableInUseHosts(in_use_result);
											})
											.then(internalNginx.reload)
											.then(() => {
												throw err;
											});
									});
							}
						})
						.then(() => {
							// At this point, the letsencrypt cert should exist on disk.
							// Lets get the expiry date from the file and update the row silently
							return internalCertificate.getCertificateInfoFromFile('/etc/letsencrypt/live/npm-' + certificate.id + '/fullchain.pem')
								.then((cert_info) => {
									return certificateModel
										.query()
										.patchAndFetchById(certificate.id, {
											expires_on: moment(cert_info.dates.to, 'X').format('YYYY-MM-DD HH:mm:ss')
										})
										.then((saved_row) => {
											// Add cert data for audit log
											saved_row.meta = _.assign({}, saved_row.meta, {
												letsencrypt_certificate: cert_info
											});

											return saved_row;
										});
								});
						}).catch(async (error) => {
							// Delete the certificate from the database if it was not created successfully
							await certificateModel
								.query()
								.deleteById(certificate.id);

							throw error;
						});
				} else {
					return certificate;
				}
			}).then((certificate) => {

				data.meta = _.assign({}, data.meta || {}, certificate.meta);

				// Add to audit log
				return internalAuditLog.add(access, {
					action:      'created',
					object_type: 'certificate',
					object_id:   certificate.id,
					meta:        data
				})
					.then(() => {
						return certificate;
					});
			});
	},
注释中提到申请流程
// Request a new Cert from LE. Let the fun begin.

1.查找使用证书中任何主机名的主机:
这一步是确定哪些服务器或服务正在使用当前证书中的域名。这通常涉及到检查nginx的配置文件,以确定哪些服务绑定到了这些域名上。

2.临时在nginx中禁用这些主机:
在进行证书更新的过程中,需要确保没有服务正在使用旧的证书。因此,需要暂时禁用这些服务,以避免在更新过程中出现冲突。

使用 DNS 质询不需要配置,因此跳过 3 和 5。

3.生成Let's Encrypt配置:
这一步涉及到创建或更新配置文件,以便Let's Encrypt的客户端(如Certbot)可以正确地请求证书。这通常包括指定域名、验证方式等信息。

4.请求证书:
使用Let's Encrypt的客户端(例如Certbot)根据生成的配置请求新的证书。这个过程可能包括域名验证,以证明你对请求证书的域名拥有控制权。

5.移除Let's Encrypt配置:
一旦证书成功获取,就不再需要临时的配置文件了。这一步是清理工作,移除这些配置以避免它们干扰到nginx的正常运行。

6.重新启用之前禁用的主机:
在证书更新完成后,需要重新启用之前被禁用的服务,这样它们就可以使用新的证书继续提供服务了。申请证书关键方法internalCertificate.requestLetsEncryptSslWithDnsChallenge(certificate)
const certbotCommand = 'certbot';

/**
	 * @param   {Object}         certificate          the certificate row
	 * @param   {String}         dns_provider         the dns provider name (key used in `certbot-dns-plugins.json`)
	 * @param   {String | null}  credentials          the content of this providers credentials file
	 * @param   {String}         propagation_seconds
	 * @returns {Promise}
	 */
	requestLetsEncryptSslWithDnsChallenge: async (certificate) => {
		await certbot.installPlugin(certificate.meta.dns_provider);
		const dnsPlugin = dnsPlugins[certificate.meta.dns_provider];
		logger.info(`Requesting Let'sEncrypt certificates via ${dnsPlugin.name} for Cert #${certificate.id}: ${certificate.domain_names.join(', ')}`);

		const credentialsLocation = '/etc/letsencrypt/credentials/credentials-' + certificate.id;
		fs.mkdirSync('/etc/letsencrypt/credentials', { recursive: true });
		fs.writeFileSync(credentialsLocation, certificate.meta.dns_provider_credentials, {mode: 0o600});

		// Whether the plugin has a --<name>-credentials argument
		const hasConfigArg = certificate.meta.dns_provider !== 'route53';

		let mainCmd = certbotCommand + ' certonly ' +
			'--config "' + letsencryptConfig + '" ' +
			'--work-dir "/tmp/letsencrypt-lib" ' +
			'--logs-dir "/tmp/letsencrypt-log" ' +
			'--cert-name "npm-' + certificate.id + '" ' +
			'--agree-tos ' +
			'--email "' + certificate.meta.letsencrypt_email + '" ' +
			'--domains "' + certificate.domain_names.join(',') + '" ' +
			'--authenticator ' + dnsPlugin.full_plugin_name + ' ' +
			(
				hasConfigArg
					? '--' + dnsPlugin.full_plugin_name + '-credentials "' + credentialsLocation + '"'
					: ''
			) +
			(
				certificate.meta.propagation_seconds !== undefined
					? ' --' + dnsPlugin.full_plugin_name + '-propagation-seconds ' + certificate.meta.propagation_seconds
					: ''
			) +
			(letsencryptStaging ? ' --staging' : '');

		// Prepend the path to the credentials file as an environment variable
		if (certificate.meta.dns_provider === 'route53') {
			mainCmd = 'AWS_CONFIG_FILE=\'' + credentialsLocation + '\' ' + mainCmd;
		}

		if (certificate.meta.dns_provider === 'duckdns') {
			mainCmd = mainCmd + ' --dns-duckdns-no-txt-restore';
		}

		logger.info('Command:', mainCmd);

		try {
			const result = await utils.exec(mainCmd);
			logger.info(result);
			return result;
		} catch (err) {
			// Don't fail if file does not exist, so no need for action in the callback
			fs.unlink(credentialsLocation, () => {});
			throw err;
		}
	},
安装Certbot插件: 使用certbot.installPlugin函数安装与证书元数据中指定的DNS提供商对应的Certbot插件。
日志记录: 使用logger.info记录正在通过哪个DNS插件请求证书,并显示证书ID和域名。
创建凭据文件:
创建/etc/letsencrypt/credentials目录(如果不存在)。
将DNS提供商的凭据写入名为credentials-<certificate.id>的文件中,并设置文件权限为600(只有所有者可读写)。
构建Certbot命令:
构建一个字符串mainCmd,其中包含Certbot命令及其所需的所有参数。
参数包括配置文件位置、工作目录、日志目录、证书名称、同意服务条款、电子邮件地址、域名列表、认证器(DNS插件)、凭据文件位置(如果插件需要的话)、传播时间(如果指定的话)以及是否使用Let’s Encrypt的staging环境。
特殊处理:
如果DNS提供商是route53,则需要将凭据文件路径作为环境变量AWS_CONFIG_FILE。
如果DNS提供商是duckdns,则在命令中添加--dns-duckdns-no-txt-restore参数。
执行命令:
使用utils.exec函数执行构建的命令。
记录命令执行的结果。
如果命令执行成功,返回结果。查看日志中最后执行的命令
[7/30/2024] [10:06:45 AM] [SSL ] › ℹ info Command: certbot certonly --config "/etc/letsencrypt.ini" --work-dir "/tmp/letsencrypt-lib" --logs-dir "/tmp/letsencrypt-log" --cert-name "npm-1" --agree-tos --email "27xxxxxxxx@qq.com" --domains "*.icurvestar.cn,icurvestar.cn" --authenticator dns-aliyun --dns-aliyun-credentials "/etc/letsencrypt/credentials/credentials-1"certbot certonly # 使用 certonly 模式,表示只获取证书,不自动配置Web服务器
--config "/etc/letsencrypt.ini" # 指定配置文件路径,Certbot 会从这个文件中读取配置信息
--work-dir "/tmp/letsencrypt-lib" # 设置工作目录,Certbot 在执行过程中会在这个目录下创建临时文件
--logs-dir "/tmp/letsencrypt-log" # 设置日志目录,Certbot 会将日志文件保存在这个目录下
--cert-name "npm-1" # 为证书设置一个名称,便于在Certbot管理多个证书时引用
--agree-tos # 自动同意 Let's Encrypt 的服务条款
--email "27xxxxxxxx@qq.com" # 设置一个电子邮件地址,用于接收证书到期通知和重要更新
--domains "*.icurvestar.cn,icurvestar.cn" # 为证书指定一个或多个域名,这里使用了通配符域名 *.icurvestar.cn 和具体域名 icurvestar.cn
--authenticator dns-aliyun # 使用阿里云的DNS作为验证域名所有权的认证方式
--dns-aliyun-credentials "/etc/letsencrypt/credentials/credentials-1" # 指定包含阿里云DNS认证凭据的文件路径,该文件应该包含访问阿里云API所需的AccessKey ID和AccessKey Secretcertbot-dns-aliyun给出的示例命令是
certbot certonly \
    --authenticator=dns-aliyun \
    --dns-aliyun-credentials='/path/to/credentials.ini' \
    -d "*.example.com,example.com"
续签
	/**
	 * @param   {Access}  access
	 * @param   {Object}  data
	 * @param   {Number}  data.id
	 * @returns {Promise}
	 */
	renew: (access, data) => {
		return access.can('certificates:update', data)
			.then(() => {
				return internalCertificate.get(access, data);
			})
			.then((certificate) => {
				if (certificate.provider === 'letsencrypt') {
					const renewMethod = certificate.meta.dns_challenge ? internalCertificate.renewLetsEncryptSslWithDnsChallenge : internalCertificate.renewLetsEncryptSsl;

					return renewMethod(certificate)
						.then(() => {
							return internalCertificate.getCertificateInfoFromFile('/etc/letsencrypt/live/npm-' + certificate.id + '/fullchain.pem');
						})
						.then((cert_info) => {
							return certificateModel
								.query()
								.patchAndFetchById(certificate.id, {
									expires_on: moment(cert_info.dates.to, 'X').format('YYYY-MM-DD HH:mm:ss')
								});
						})
						.then((updated_certificate) => {
							// Add to audit log
							return internalAuditLog.add(access, {
								action:      'renewed',
								object_type: 'certificate',
								object_id:   updated_certificate.id,
								meta:        updated_certificate
							})
								.then(() => {
									return updated_certificate;
								});
						});
				} else {
					throw new error.ValidationError('Only Let\'sEncrypt certificates can be renewed');
				}
			});
	},
具体renewMethod续签方法是由之前是否开启dns验证(certificate.meta.dns_challenge)来决定的
const renewMethod = certificate.meta.dns_challenge ? internalCertificate.renewLetsEncryptSslWithDnsChallenge : internalCertificate.renewLetsEncryptSsl;{
"id": 2,
"created_on": "2024-07-30 10:09:04",
"modified_on": "2024-07-30 10:09:18",
"owner_user_id": 1,
"provider": "letsencrypt",
"nice_name": "icurvestar.cn, *.icurvestar.cn",
"domain_names": [
"*.icurvestar.cn",
"icurvestar.cn"
],
"expires_on": "2024-10-28 09:09:14",
"meta": {
"letsencrypt_email": "2xxxxxxxx@qq.com",
"dns_challenge": true,
"dns_provider": "aliyun",
"dns_provider_credentials": "dns_aliyun_access_key = Lxxxxnx\r\ndns_aliyun_access_key_secret = 6xxxxxxxxxxz",
"letsencrypt_agree": true
},
"owner": {
"id": 1,
"created_on": "2024-07-30 09:49:58",
"modified_on": "2024-07-30 09:59:01",
"is_deleted": 0,
"is_disabled": 0,
"email": "2xxxxxxx@qq.com",
"name": "Administrator",
"nickname": "Admin",
"avatar": "//www.gravatar.com/avatar/b205faed9921bb6e0ad7de3b7a18ed66?default=mm",
"roles": [
"admin"
]
}
}我的证书是用dns验证的所以meta.dns_challenge为true,选择用renewLetsEncryptSslWithDnsChallenge方法续签
	/**
	 * @param   {Object}  certificate   the certificate row
	 * @returns {Promise}
	 */
	renewLetsEncryptSslWithDnsChallenge: (certificate) => {
		const dnsPlugin = dnsPlugins[certificate.meta.dns_provider];

		if (!dnsPlugin) {
			throw Error(`Unknown DNS provider '${certificate.meta.dns_provider}'`);
		}

		logger.info(`Renewing Let'sEncrypt certificates via ${dnsPlugin.name} for Cert #${certificate.id}: ${certificate.domain_names.join(', ')}`);

		let mainCmd = certbotCommand + ' renew --force-renewal ' +
			'--config "' + letsencryptConfig + '" ' +
			'--work-dir "/tmp/letsencrypt-lib" ' +
			'--logs-dir "/tmp/letsencrypt-log" ' +
			'--cert-name "npm-' + certificate.id + '" ' +
			'--disable-hook-validation ' +
			'--no-random-sleep-on-renew ' +
			(letsencryptStaging ? ' --staging' : '');

		// Prepend the path to the credentials file as an environment variable
		if (certificate.meta.dns_provider === 'route53') {
			const credentialsLocation = '/etc/letsencrypt/credentials/credentials-' + certificate.id;
			mainCmd                   = 'AWS_CONFIG_FILE=\'' + credentialsLocation + '\' ' + mainCmd;
		}

		logger.info('Command:', mainCmd);

		return utils.exec(mainCmd)
			.then(async (result) => {
				logger.info(result);
				return result;
			});
	},
最后具体 Certbot 续签命令:
let mainCmd = certbotCommand + ' renew --force-renewal ' +
    '--config "' + letsencryptConfig + '" ' +
    '--work-dir "/tmp/letsencrypt-lib" ' +
    '--logs-dir "/tmp/letsencrypt-log" ' +
    '--cert-name "npm-' + certificate.id + '" ' +
    '--disable-hook-validation ' +
    '--no-random-sleep-on-renew ' +
    (letsencryptStaging ? ' --staging' : '');
在Nginx Proxy Manager申请证书后会自动续签(在internalCertificate.processExpiringHosts方法),每隔一个小时,系统将检查一次证书的过期状态,若是距离过期小于30天会执行internalCertificate.renew方法
附录
手动安装certbot使用http方式申请证书时需要关闭Nginx,是因为certbot需要用80端口验证路径文件,可以自己添加路径映射无需关闭
location ^~ /.well-known/acme-challenge/ {
  alias C:/nginx/.well-known/acme-challenge/;
}
location /.well-known/acme-challenge/ {
root c:\documents and settings\myUser\html_folder\acme_challenges\;
}必须授予 www-data 用户的权限
sudo chown -R www-data:www-data .well-known一个提供专业的证书管理服务工具: