git
安装
下载链接
https://mirrors.edge.kernel.org/pub/software/scm/git/
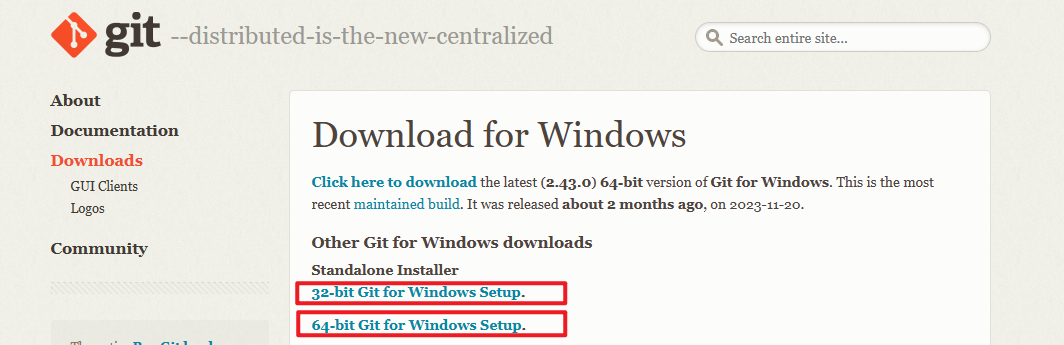
Windows
下载
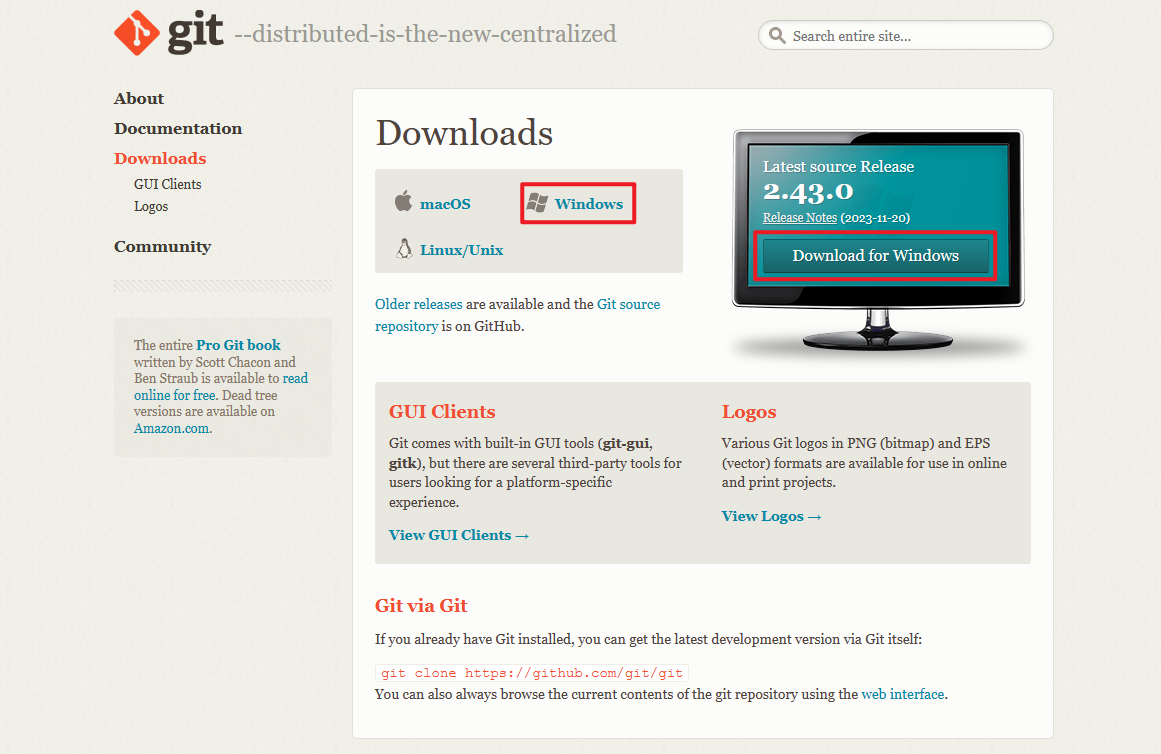
选择 32 or 64 位
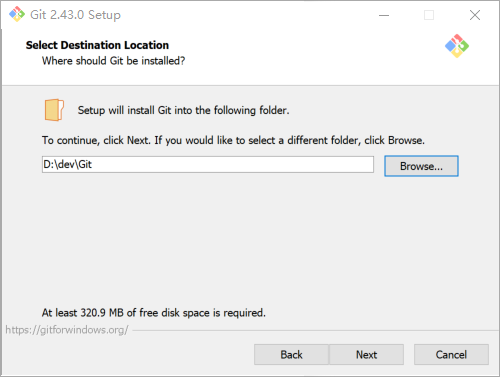
安装
选择安装路径
按需选择
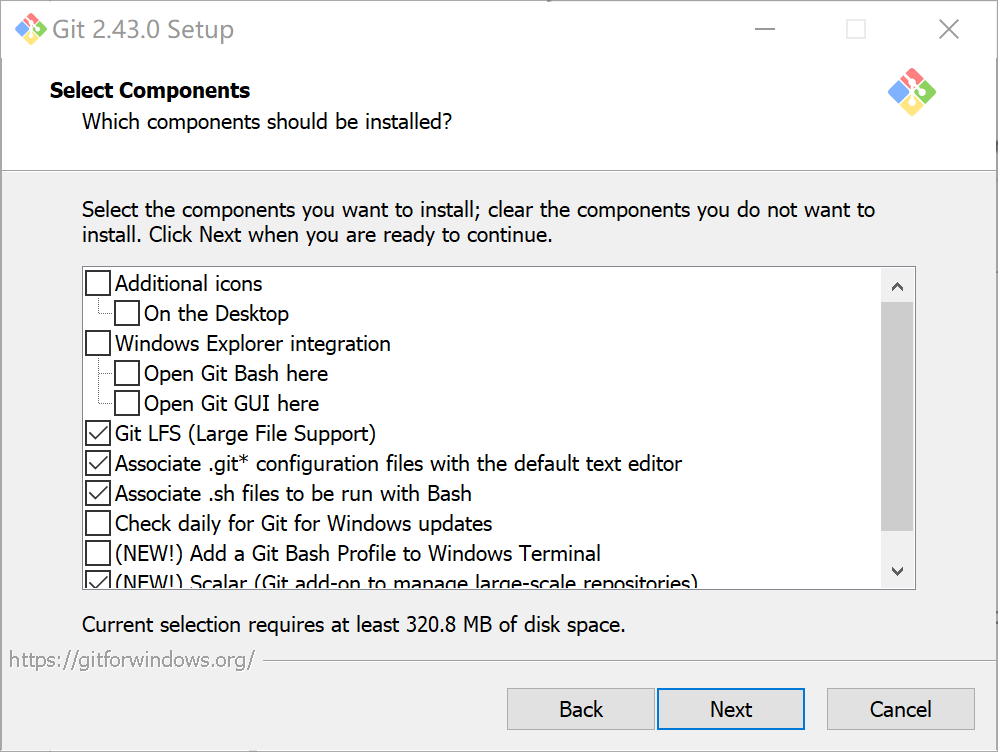
On the Desktop 在桌面创建图标 Git Bash Here与Git GUI Here 添加到右键菜单栏中 Git Large FileSupport Git支持大文件 Associate .git* configureation files with the default text editor 将.git文件关联的默认编辑器 Associate .sh files to be run with Bash 关联.sh文件在Bash中运行 Check daily for Git for Windows updates 每天检查Git更新 (NEW!) Add a Git Bash Profile to Windows Terminal 将Git Bash关联到Windows terminal (New!)Scalar(Git add-on ro manage large-scale repositories) 使用Scalar(Git大文件管理插件)
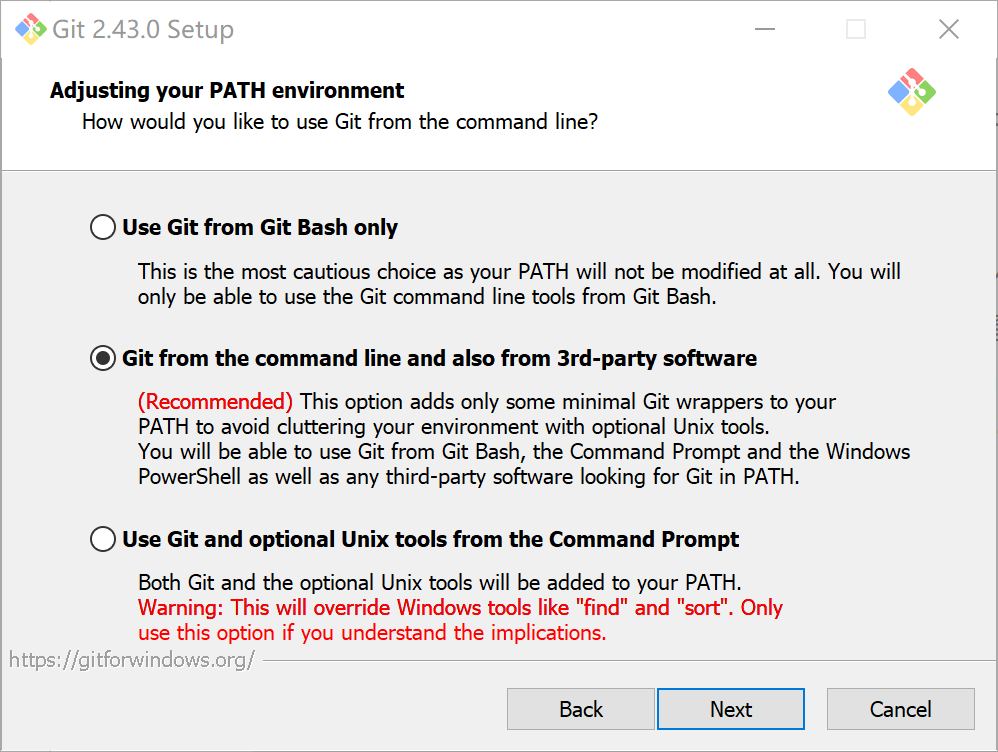
Use Git from Git Bash only 仅使用Git Bash Git from the command line and also from 3rd-party software 使用命令行与第三方的软件 Use Git and optional Unix tools from the Command Prompt 使用Unix编辑器
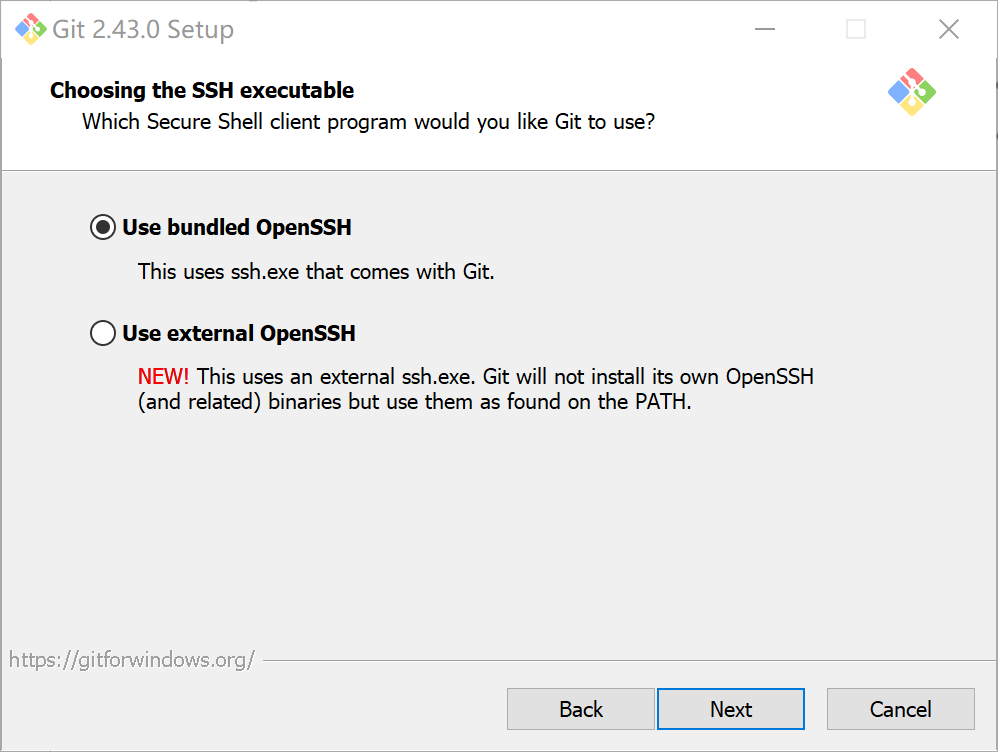
Use bundled OpenSSH 使用Windows的OpenSSH Use external openSSH 使用外部的OpenSSH
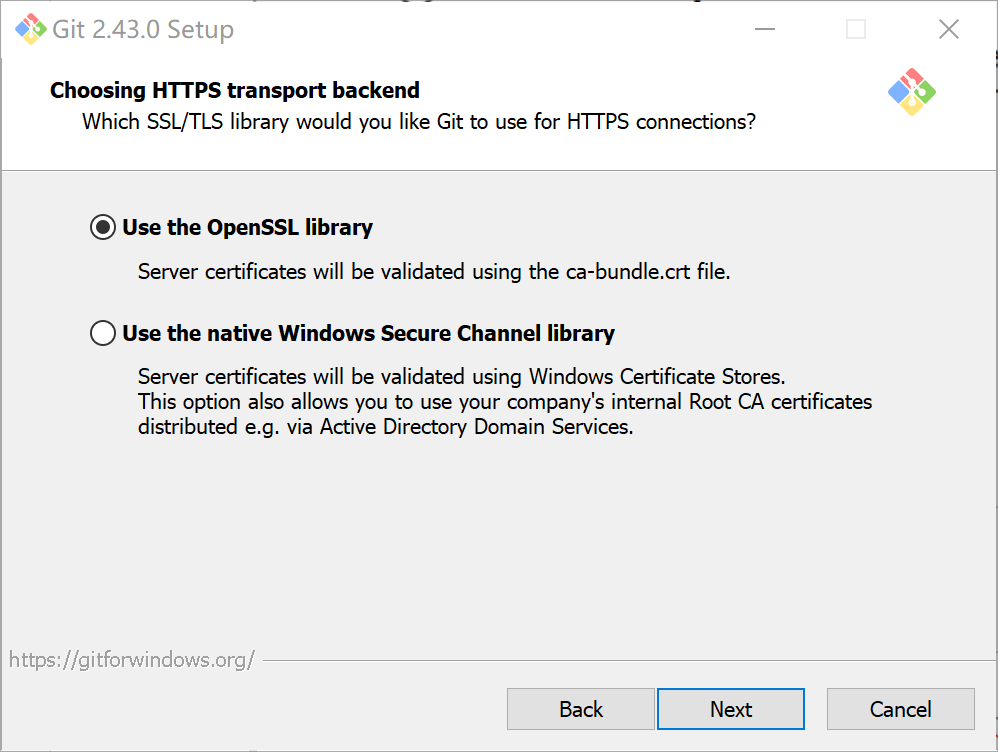
Use the OpenSSL library 使用OpenSSL库 Use the native Windows Secure Channel library 使用Windows安全库
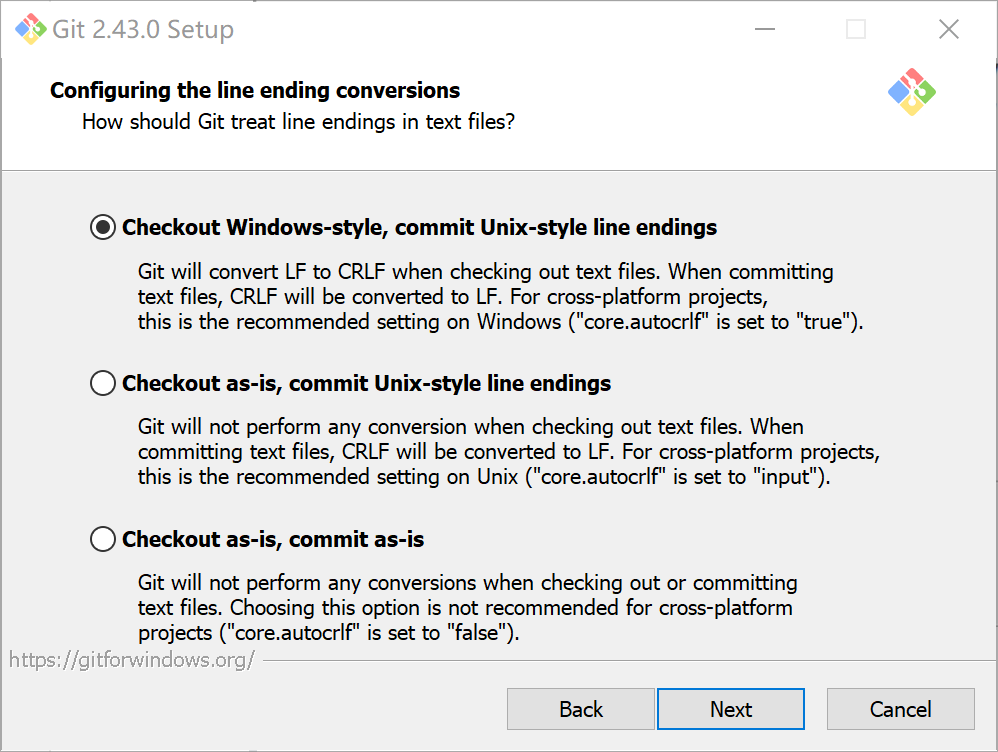
Checkout Windows-style,commit Unix-style line endings 将Windows格式的文件,以Unix的格式提交 Checkout as-is,commit Unix-style line endings 按Unix样式提交 Checkout as-is,commit as-is 按原样提交
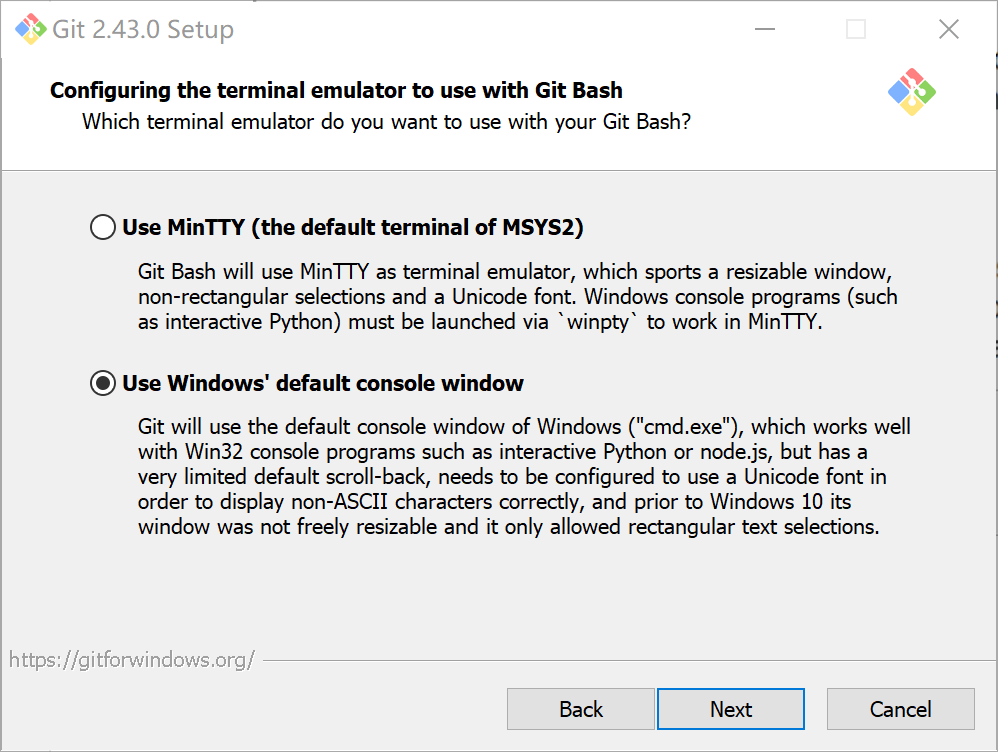
Use MinTTY(the default terminal of MSYS2) 使用MinTTY(Git默认编辑器) Use Windows's default console window 使用windows默认控制台
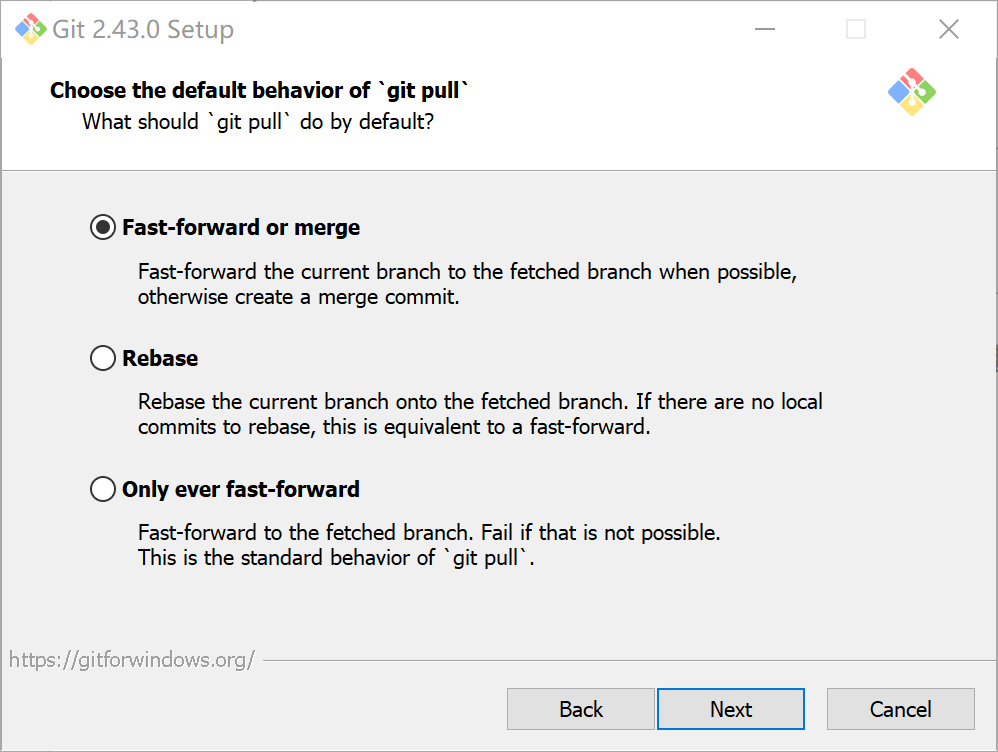
Default(fast-forward of merge) 快速合并(默认) Rebase 将刚下载的版本设为最新版本 Only ever fast-forward 只能拉去获取到的分支,如果没有,则无效
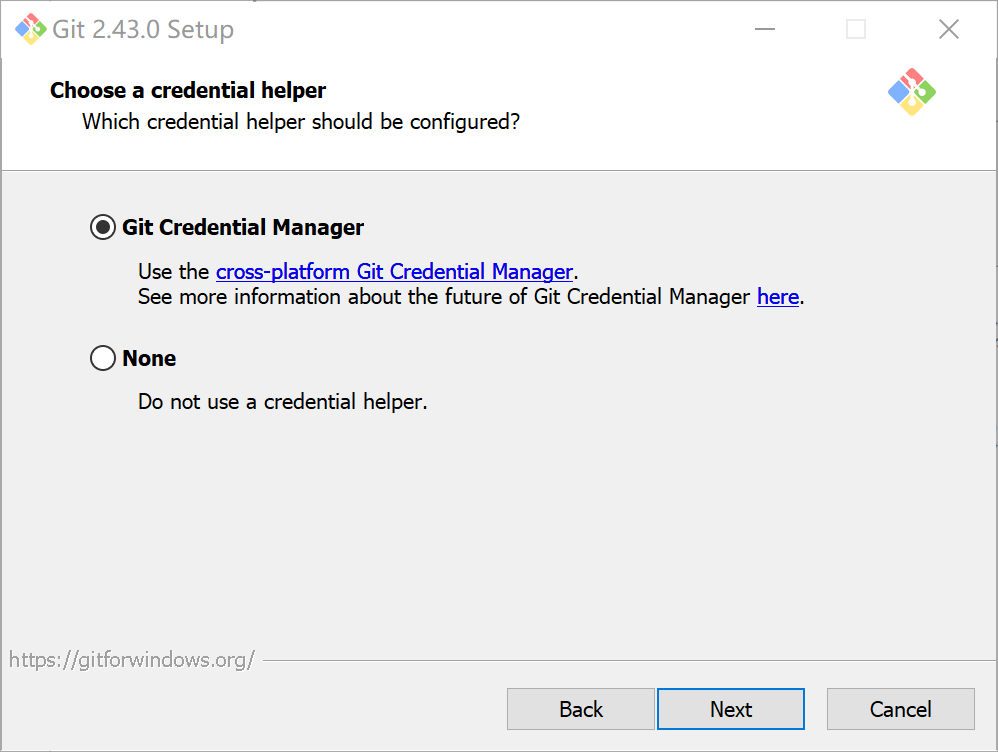
Git credential Manager 使用Git官方凭证 None 不适用凭证
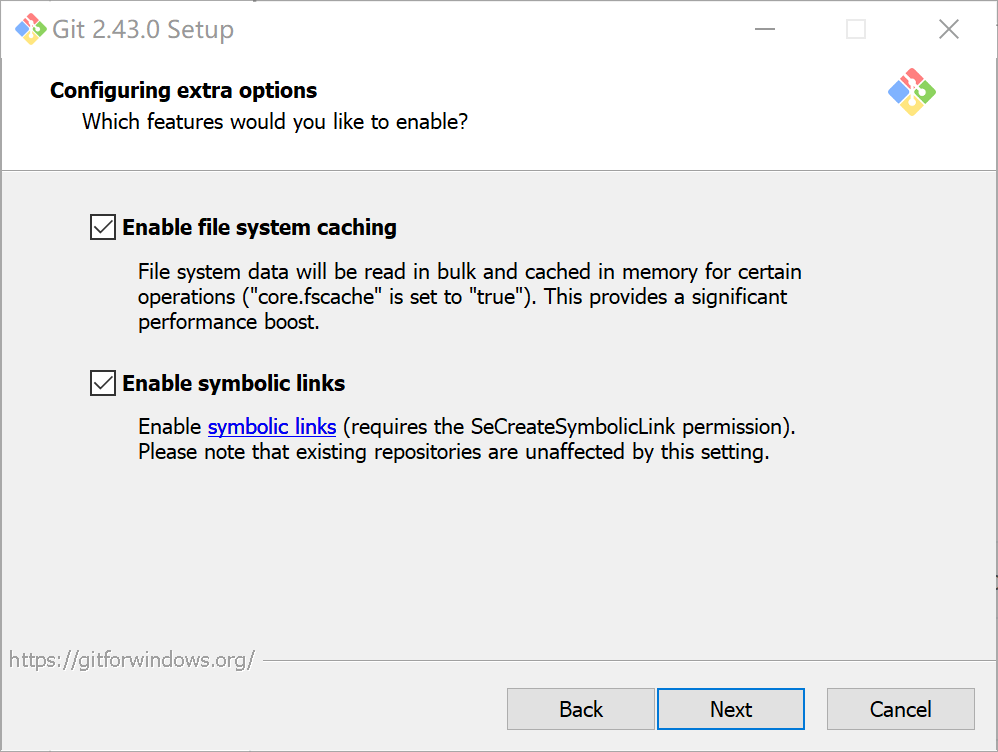
Enable file system caching 使用文件缓存 Enable symbolic links 使用符号连接

Enable experimental support for pseudo consoles 启用对伪控制台的实验性支持(有bug) Enable experimental built-in file system monitor 启用实验性内置文件系统监视器
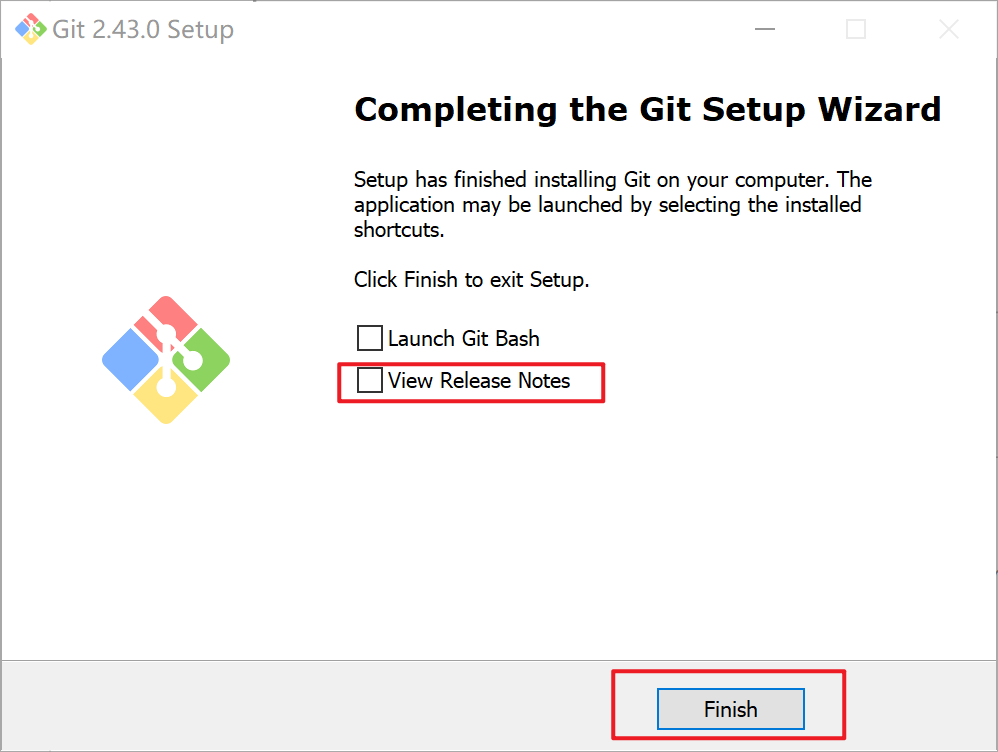
完成
Liunx
下载
wget http://mirrors.edge.kernel.org/pub/software/scm/git/git-2.41.0.tar.gz解压
tar -zxvf git-2.39.0.tar.gzgit安装
cd git-2.39.0
./configure
make && make install
查看git版本
git versionSSH密钥
ssh-keygen -t rsassh-keygen -t rsa -f "D:\dev\ssh-key\2024-01-14\id_rsa"Gitee配置公钥
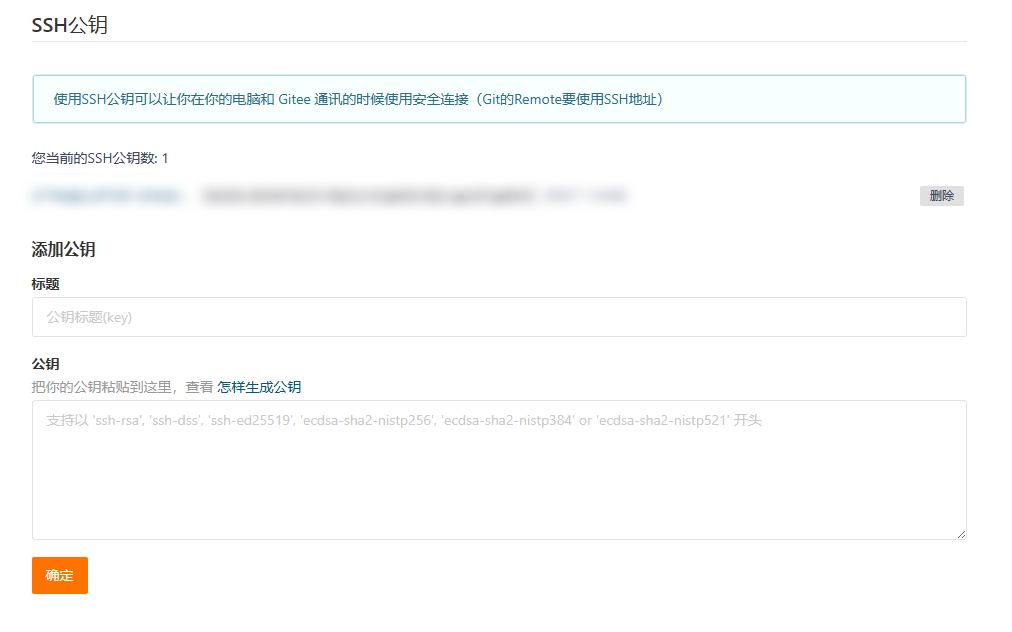
官方文档-https://help.gitee.com/base/account/SSH%E5%85%AC%E9%92%A5%E8%AE%BE%E7%BD%AE
查看默认生成的位置
ls ~/.ssh/
Gitee-->设置-->安全设置-->SSH公钥-->添加公钥-->确定
常用命令
git 全局设置
git config --global user.name "xxxxxxx"
git config --global user.email "xxxxxxx@xx.xxx"
创建 git 仓库
初始化本地仓库
mkdir empty-warehouse
cd empty-warehouse
git init
添加远程链接
git remote add origin https://gitee.com/xxxxxx/empty-warehouse.git查看远程连接
git remote -vgit取消与远程仓库的连接
git remote remove origin当前仓库git设置
git config --local user.name "用户名"
git config --local user.email "邮箱地址"
拉取
git pull origin master提交
git commit -m "first commit"已有仓库?
cd existing_git_repo
git remote add origin https://gitee.com/xxxxxx/empty-warehouse.git
git push -u origin "master"
第一次提交到远程仓库
1.初始化
>git init
Initialized empty Git repository in D:/Code/IDEA_Code/ruoyi/.git/2.创建README.md文件
3.创建.gitignore文件
https://blog.csdn.net/weixin_44860226/article/details/129668726
我们平时在开发过程中,经常会包含一些不希望被别人看到,或者不需要被别人看到的文件,比如IDEA项目的配置目录.idea、node模块的包目录node_modules等;
通过 .gitignore 文件来将这些路径排除掉,这样提交时就不会把这些目录提交到远程仓库
4.将文件添加到暂存区
先设置格式转换
#提交时转换为LF,检出时转换为CRLF
git config --global core.autocrlf true
git add .作用:
追踪新文件: 如果当前目录或其子目录中有尚未被 Git 跟踪的新文件(即未被 git init 或 git clone 初始化后自动跟踪,且尚未使用 git add 添加过的文件),这些新文件会被添加到暂存区,从而开始被 Git 进行版本控制。
暂存已修改文件: 对于当前目录及其子目录中已被 Git 跟踪且已被修改的文件,执行 git add . 将会把它们的最新更改添加到暂存区。这意味着这些文件的当前状态(相对于上一次提交)将被标记为准备提交。
递归处理子目录: 由于使用了 ., Git 不仅会处理当前目录中的文件,还会递归地处理所有子目录中的文件。无论是新文件、已修改文件还是已删除文件(在 Git 的视角中表现为已跟踪文件的删除),只要它们位于当前目录及其子孙目录中,都会受到 git add . 命令的影响。
5.提交本地git
git commit -m "消息"git commit -m "后端原始"6.添加远程仓库链接
git remote add origin https://gitee.com/fsdfd/fdsfwa.git查看
>git remote -v
origin  https://gitee.com/xxxxxx/icurvestar.git (fetch)
origin  https://gitee.com/xxxxxx/icurvestar.git (push)
一个远程仓库通常会有两个URL:一个用于拉取(fetch)更新,另一个用于推送(push)更新。
- fetch URL(拉取URL): 这个URL是用于从远程仓库获取更新的。当你运行
git fetch命令时,Git会访问这个URL来获取远程仓库的最新提交历史和文件。- push URL(推送URL): 这个URL是用于向远程仓库推送更新的。当你运行
git push命令时,Git会使用这个URL来上传你的本地提交到远程仓库。
7.推送至远程仓库
git push -u origin "master"新建分支
基于master创建statistics分支
确保当前工作目录干净: 首先,确保您当前的工作目录没有未提交的更改。如果有未提交的更改且希望保留,可以先将它们暂存(git add .)并提交到当前分支(git commit -m "Your commit message")。
创建新分支: 使用git branch命令加上您想要的新分支名来创建分支。
git branch statistics此时,新分支已创建,但仍在当前分支上工作。
切换到新分支: 若要开始在新分支上工作,需要使用git checkout命令切换到新创建的分支:
git checkout statistics快捷
可以合并以上两步,直接使用git checkout -b命令创建并立即切换到新分支:
git checkout -b statistics执行后,已处于新分支“statistics”,在此分支上的任何新增、修改和删除操作都将只影响该分支。
查看分支
>git checkout -b statistics
Switched to a new branch 'statistics'

>git branch
  master
* statistics
推送
git push -u origin statistics
-u或--set-upstream:这是一个选项,用于设置本地分支与远程分支之间的关联(upstream tracking)。当首次推送一个本地分支到远程仓库时,使用-u参数会自动将远程分支设置为本地分支的上游跟踪分支。这意味着 Git 会记住这次关联,之后在该本地分支上执行git pull或git push(不带任何参数)时,Git 自动知道应该与哪个远程分支交互。设置本地
statistics分支与远程origin/statistics分支之间的跟踪关系,简化后续的git pull和git push操作,无需每次都明确指定远程仓库和分支名称。
查看分支
>git branch
  master
* statistics
切换分支
git checkout branch_namegit checkout master推送
新增了sql文件夹
# 暂存
git add sql
# 提交
git commit -m "添加数据库"
# 推送 (由于已经设置了跟踪关系,可以简化命令为)
git push
合并分支
1. 更新本地 master 和 dev 分支
首先,确保你的本地 master 和 dev 分支都是最新的。
# 切换到master分支
git checkout master

# 更新本地的master分支
git pull origin master

# 切换到dev分支
git checkout dev

# 更新本地的dev分支
git pull origin dev
2. 将 dev 分支合并到 master 分支
切换到 master 分支,并将 dev 分支合并进去。
# 切换到master分支
git checkout master

# 合并dev分支到master分支
>git merge dev
Updating 32babbe..9874251
Fast-forward
 .dockerignore                                      | 11 ++++
 Dockerfile                                         | 22 ++++++++
 deploy.sh                                          | 13 +++++
 docker-compose.yml                                 | 16 ++++++
 ...272\214\346\224\271\346\214\207\345\215\227.md" | 66 +++++++++++++++++++++-
 5 files changed, 127 insertions(+), 1 deletion(-)
 create mode 100644 .dockerignore
 create mode 100644 Dockerfile
 create mode 100644 deploy.sh
 create mode 100644 docker-compose.yml
3. 解决冲突(如果有的话)
如果在合并过程中出现了冲突,Git 会提示你处理冲突。你需要手动解决冲突,然后将修改标记为已解决,并继续合并。
# 编辑冲突的文件,解决冲突后
git add <文件名>

# 继续合并
git merge --continue
4. 推送更新到远程 master 分支
合并完成并确认没有冲突后,你可以将本地的 master 分支推送到远程。
git push origin mastergitignore
从git记录中删除对应的文件或目录;
git rm -rf --cached .-rf:表示递归+强制
–cached: 表示只删除git记录,不删除本地文件;如果不添加这个选项,则本地文件也会被删除 . : 表示删除当前目录的所有git记录,如果只是想删除指定的文件,可以用具体的文件名替代,比如
git rm -rf --cached demo.txt
如果误删除了所有git记录,可以用git restore --staged .恢复
问题
LF与CRLF
LF(Line Feed)和CRLF(Carriage Return Line Feed)是两种不同的行尾字符:
- LF:仅包含换行符(\n),通常用于Unix/Linux系统。
- CRLF:包含回车符(\r)和换行符(\n),通常用于Windows系统。
LF will be replaced by CRLF the next time Git touches it解决方法
设置方法一:
#提交时转换为LF,检出时转换为CRLF
git config --global core.autocrlf true
*适用于Windows系统,且一般为Windows默认设置,会在提交时对换行符进行CRLF - LF的转换,检出时又会进行LF - CRLF的转换。
设置方法二:
#提交时转换为LF,检出时不转换
git config --global core.autocrlf input
*适用于Linux系统,所有换行符都会进行CRLF - LF转换,但操作时不会转换回CRLF。
设置方法三:
#提交检出均不转换
git config --global core.autocrlf false
*适用于Windows系统,且只在Windows上开发的情况。在提交、检出时不会对CRLF/LF换行符进行转换
文件提交时进行safecrlf检查:
#拒绝提交包含混合换行符的文件
git config --global core.safecrlf true

#允许提交包含混合换行符的文件
git config --global core.safecrlf false

#提交包含混合换行符的文件时给出警告
git config --global core.safecrlf warn
参考
https://www.bilibili.com/read/cv21729112/
https://www.cnblogs.com/lcxhk/p/14345592.html